Step 6 Output Data
The purpose of the Output Data tab is to establish the final destination for your derived data with data element definitions. This is where you decide what data to output and define how it arrives at its final destination.
For example, you might decide to output a small number of derived fields to an Excel file. Or, you might choose to output the majority of your derived fields to a XML file format. This document describes how to accomplish the tasks to build your output data.
-
In the Output Data tab, click Add New Output Type to open the New Output Configuration dialog.
-
The Config Type field (required) defaults to a value of Custom. Use this value.
-
In the Format drop-down list, select a file format to use for your output. The page options change according to the format option selected. Use the table below to select options the Name, Group Type and File name options.
| Format |
Name Field |
Group Type |
File Name (required) |
|---|---|---|---|
|
Excel |
Type the name you want to assign to the Data Output format. For example a name might be: All Premium Records Output |
Choose one the following options:
NOTE: When you select a Multi Sheet option, a field for Number of Records Per File will open, this will determine the total number of records that can appear in the file (for example, it will default to 1; however, can be changed to allow any limit)
|
This is a required field. This will default to a name such as OutputDataExport-{{timeStamp}}.xlsx. You may edit the name. The {{ }} item is a system item that will be automatically generated; in this example, the timestamp of when the file itself was actually created. |
|
CSV |
Type the name you want to assign to the Data Output format. For example a name might be: All Premium Records Output |
This is a required field and is needed to define the comma delimited file format. There are two options: Single File: There will be only a single comma delimited file generated Multiple Files: Multiple comma delimited files will be generated
NOTE: With this file type option you do not have the sheet options since CSV files do not have sheet capability
|
This is a required field. This will default to a name such as OutputDataExport-{{timeStamp}}.csv. You may edit the name. The {{ }} item is a system item that will be automatically generated; in this example, the timestamp of when the file itself was actually created.
|
|
JSON |
Type the name you want to assign to the Data Output format. For example a name might be: All Premium Records Output |
This is a required field and has only one, default option which is File per Record, meaning that one JSON file will be generated for each record being output
|
This is a required field. This will default to a name such as OutputDataExport-{{timeStamp}}.json. You may edit the name. The {{ }} item is a system item that will be automatically generated; in this example, the timestamp of when the file itself was actually created.
|
|
XML |
Type the name you want to assign to the Data Output format. For example a name might be: All Premium Records Output |
Same as above |
This is a required field. This will default to a name such as OutputDataExport-{{timeStamp}}.xml. You may edit the name. The {{ }} item is a system item that will be automatically generated; in this example, the timestamp of when the file itself was actually created.
For this format, an additional drop-down selection list appears. Click Choose File and select an XML file format to inport:
|
-
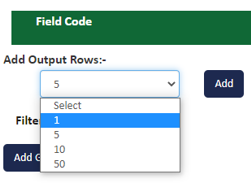
Next, define then number of Output Rows, or fields of information, that you intend to include in your output file(s).
-
Click Add. The system adds Output Row configuration options for each line.

-
Complete the Output Row fields following the table below:
-
From the Field Code drop-down list, select a raw or derived field to include in your output data. The list of options is composed of
-
Raw fields as defined in Step 2 - Raw Data Registration in your template.
-
Derived fields defined in thStep 4 - Derived Data in your template.
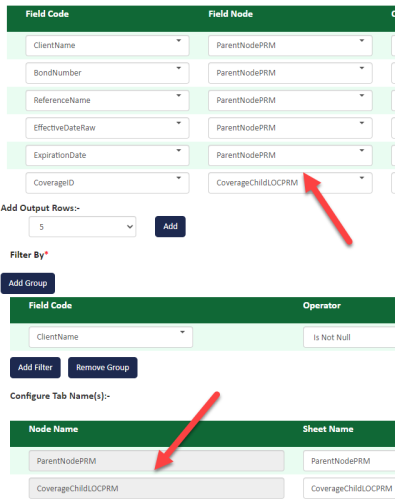
In the image sample in shown below, ClientName is the selection from the available list.
-
-
From the Field Node drop-down list, select a field node where you intend to place the field in the data hierarchy. Nodes are defined in the Field Node Mapping step.
Note that the only options available in the list are those that have been defined. In this example, for the Field Code ClientName, the only Field Node it has been made a part of is ParentNodePRM and so that is the only option in the drop-down.
-
Leave the Transformation default setting of None unless you intend to use Aggregate functions (Sum or Count) to create aggregate field data. See the section Add New Configuration Output (with Aggregates) below to learn to set these functions for aggregated results in your output data.
-
Output Label - This field will default to the name of the FieldCode (first column). You can change the name to display what you prefer.
-
A completed Output row will look similar to the one shown below:

-
Use the up and down arrows at the end of each row, to order your list of output data items. If you need to remove a row, click the x symbol to delete it.
-
Click Add Group to filter or group certain records in the output. Once you select Add Group, you can then add a value to the Field Code field to group like elements together.
-
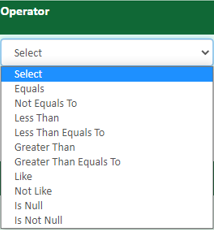
The operator you select from the Operatordrop-down list determines the records to include.
-
Depending on what is selected for an Operator, the Constant field may then need to be populated.
If you choose the Is Not Null or Is Null operator, you will not need a constant because the logic is not looking for a specific value but whether a value is present (in our example, the ClientName field) where your template is applied. When you choose another operator, then you define the equivalent value.
If you select PolicyStatus as the field code, an operator of Equals might have a constant of Active. In this scenario, only records where the PolicyStatus of the record was equal to Active would be included in the Data Output.
-
-
The Conjunction options provide a way to define complex rules for filtering data. Continuing our example using ClientName, the data output should only include records where PolicyStatus equals Active AND where ClientName Is Not Null. Or you might want to see only those records where PolicyStatus is Non-Renewed OR where PolicyStatus is Cancelled to see where opportunities exist to regain lost insureds.
The options for Conjunction are limited to AND and OR. -
When a filter is no longer needed, remove the filter row by clicking X under the Delete column.
-
When the grouping/filter is no longer needed, click the Remove Group button.
-
The SheetName is populated based on field nodes defined in the Field list but you can manually overwrite the default values and rename the sheets. In the example below, the sheets are named based on the two field nodes (ParentNodePRM and CoverageChildLOCPRM as shown in the field list).
-
Complete the steps below as needed:
-
If the Output Data needs to be edited, click Open at the end of the row (output data definition) to be edited.
-
If the Output Data is no longer needed and can be deleted or replaced, click Delete to remove the output data definition in its entirety.
-
-
Once you have completed all Data Output fields, click Save to save the work and return to the main Template Manager screen.
|
|
How the fields are ordered/displayed in this screen is how they will be output into the file(s) defined. If you take time to plan the order in advance, the need to use the arrows at this stage. |
The controls on this page provide a way to identify multiple records and add them together for an aggregate amount as part of your output data. You can get a count of the number of total records used in creating the aggregate. In addition to the sum and count functions, it is possible to get a minimum and maximum amount in data.
Apply the Sum, Count, Min or Max functions to fields as shown below.
Once you have added fields into the Output Data screen, you can apply the Sum or Count functions to your data field to add or count numeric records in your data set.
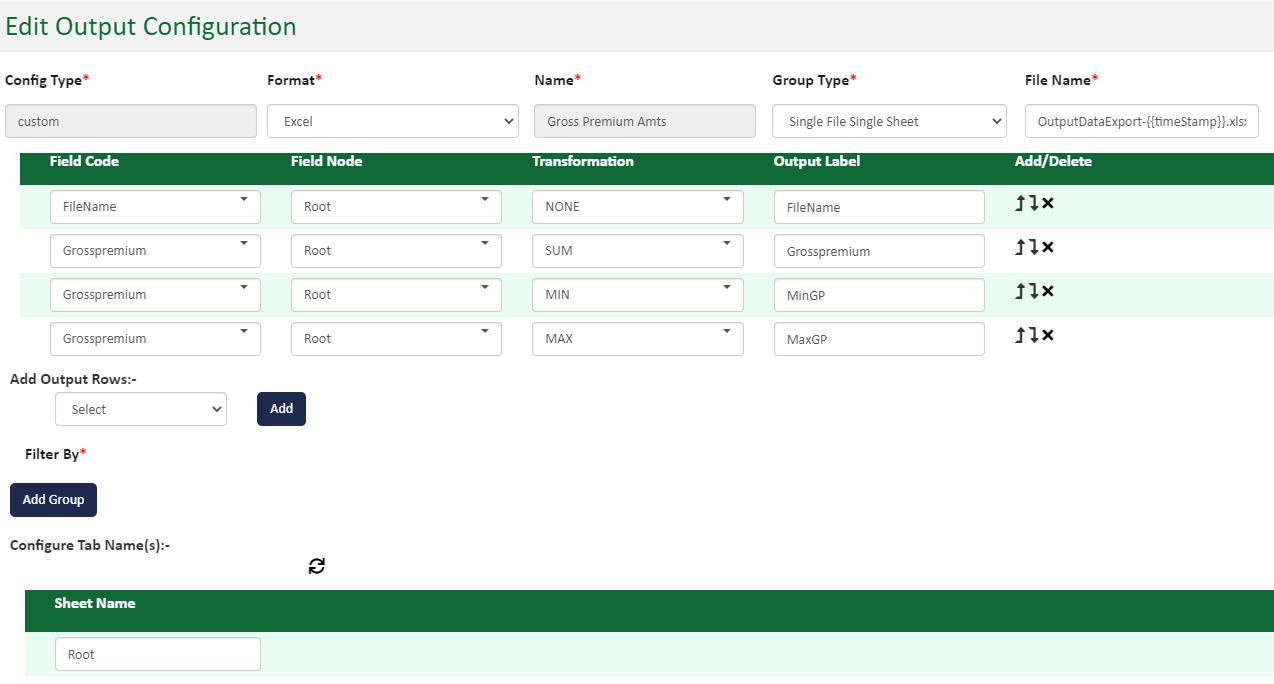
In the image below, note the settings in the Transformation column. This setting identifies the fields where sums are to be made through the Transformation feature. The field in the top position is FileName. It's a text field so available to the Count function in terms of how many times the field occurs.
The second field from the top signifies where the PremiumAmt data for each record will be stored. PremiumAmt is a numeric field so is available to adding (Sum) or counting (Count).
When a template executes using this output configuration setting shown below, the PremiumAmt total figure will be found in the Premium data field in the output data set.
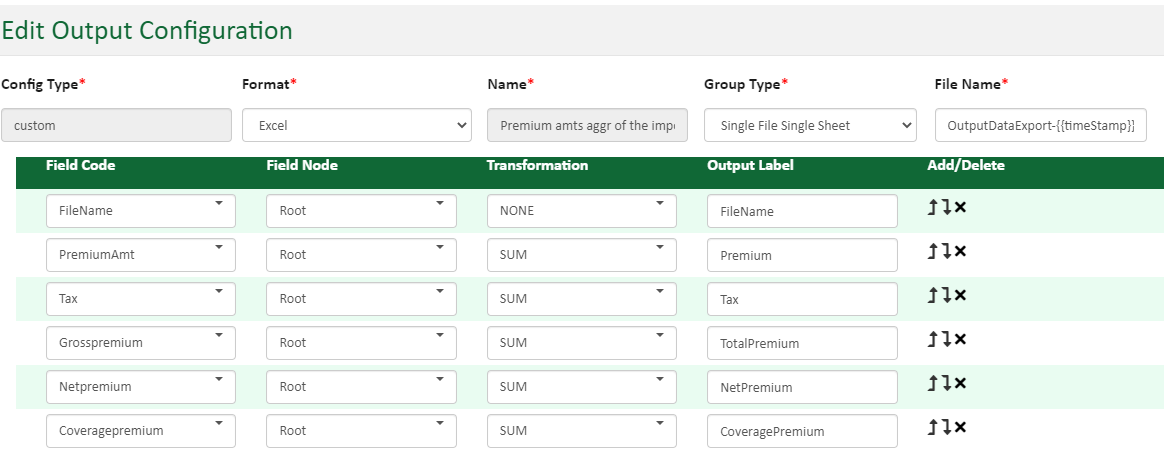
In the image below, the example shows how to get a sum of gross premium as well as its highest (Max) and smallest (Min) amounts.
When a template is executed with the output configuration shown below, the Grosspremium amount will contain the sum of all the data in that field for each record in the data set. The output data set will also include the minimum and maximum amount found in the data for the Grosspremium data fields.
