Field Node Mapping
Bordereaux
With the Field Node Mapping feature in Bordereaux, build hierarchal, or nested, data structures for incoming and outgoing data. The image below shows a potential hierarchal data structure where field nodes are applicable.
In the above example, a policy data element has two locations and two coverage types for each location. In an XML file, the structure would resemble the following:
Policy
Location 1
Coverage 1-1
Coverage 1-2
Location 2
Location 2
Coverage 2-1
Coverage 2-2
Notable Behaviors
-
The system does not restrict the number of nodes you can build but it does allow only one root node per import type (Policy, Claims, etc).
-
If you do not establish a data hierarchy, the system creates one default, parent node and all fields will fall under that one node.
-
Field nodes created without a specified parent node are considered root nodes. The first node created would become a root node.
-
When working in the same import type, the previously created node will be available for selection under parent node drop-down list. Select it to create the next level of hierarchy.
-
If you creating a third node for the same import type, the two previously created nodes will be available for selection under Parent Node drop-down list.
Create and Maintain Field Nodes
-
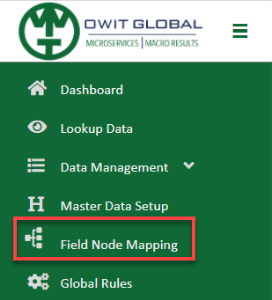
Click Field Node Mapping option to open the Field Node Mapping screen.
-
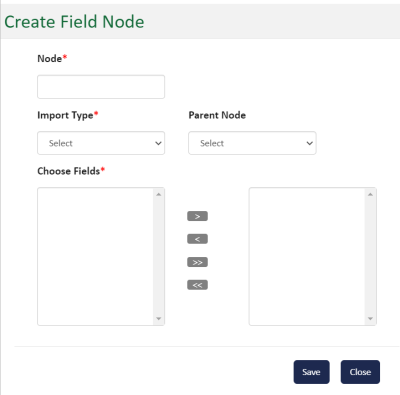
Click Create Field Node to open the Create Field Node dialog.
Note that even when you do not intend to create a complex hierarchical structure to your data, there must be at least one default or parent field node. The parent node can store all your data files beneath it to made it available for use in your template.
-
In the Node box, enter in a name for the field node. (required)
-
From the Import Type drop-down list, chose the type of field you are importing based on tags assigned when fields are created. Options in the drop-down are: (required)
-
Premium - for Bordereaux, insurance tagged items
-
Cash - for Bordereaux, insurance tagged items
-
Claims - for Bordereaux, insurance tagged items
-
Others - for ETL, ETL tagged items
-
-
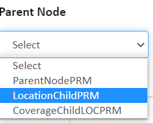
Use the Parent Node drop-down list to create a secondary level, or child node, within a parent node. If the node you are creating (Step 3) is to be a child of another node, select the parent node from the drop-down list. For example, assume the field node you are creating is Coverages, and the parent (higher level) node is for Location, select the appropriate Location data field from the Parent Node drop-down list. The image below shows some example Parent Node options. Note that this field is optional unless you are building multilevel data hierarchy.

-
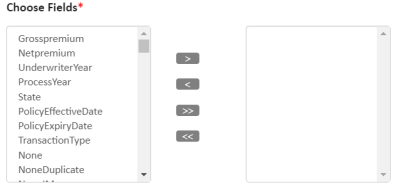
Next, use the Choose Fields section to define fields to be included in the field node you are creating. (required)
Use the arrow buttons to add or remove fields. The left box includes available fields, the right box will contain your selected fields.
-
To include all fields in your node, click the double-right-pointing arrow icon. To reverse the action and remove all, click the double-left-pointing arrow.
-
To include on field from the list of available items, click it to select it and click the right-pointing arrow. To reverse a selection, select the field and click the left-pointing arrow.
-
-
When you have selected and refined your list, click Save.
View Existing Field Nodes
When Field Nodes are created, they will appear in the main Field Node Mapping screen with high-level information about each node provided as follows:

Completed field nodes display on the Field Node Mapping landing page in summary form. The following column headings help identify information about the nodes.
-
Node - The name or title of the Field Node you create.
-
Parent Node - The parent-level node of the node identified in the Node column.
-
Import Type - Defines import type tag (Premium, Cash, Claims, Others) and it data type.
-
Created By: Represents the user name of the individual who created the field node.
-
Created Date: The date the field node was created.
The Actions button includes the following options:
-
Edit - Click to open the Edit Field Node dialog. You will be able to make changes to the existing fields. Add or removed fields or the parent node selection.
-
View - Click to open the View Field Node dialog to review the selections made.

 ) to open up the menu as shown below.